Interface
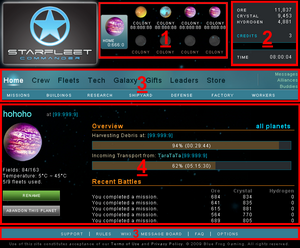
The interface is pretty intuitive: At the top of the page, you can see the Planet selection where your Homeworld and 8 possible Colonies are displayed with name and coordinates. You can select each of your planets by clicking on it, which will then be highlighted in blue.
Displayed in the top right corner are the current Resources for the selected planet, your game Credits balance, as well as the current game time. Note that the game time is the same for all players around the world. All in-game Notifications such as downtime, upgrades, maintenance, etc... will be based on game time.
Below you'll find the menu and the main screen. While the main screen will change accordingly to the section you selected in the menu, the menu itself will stay the same, the only difference being the highlight of the section you are currently viewing. The menu and main screen content are always related to the currently selected planet only, except for the Home section. Selecting another planet will change the planet you are currently viewing, but not your current menu selection. As an example: If you are in the Buildings section of your Homeworld and select one of your colonies, the main screen will change to display the colony's Buildings section. That way you can check each section for each planet one after the other, without having to select the section again after you select another planet.
The StarFleet menu is divided into 3 groups:
- The General Menu, which allows you to access your empire as a whole.
- The Planetary Specific Menu, which allows you to access specific areas of the Planet you have currently selected.
- The Support Menu, which is a valuable source of information related to the game.
General Menu
On the right end of the menu, you can also access your game Messages, your Alliance Message forum, and your Buddies list.
Home 
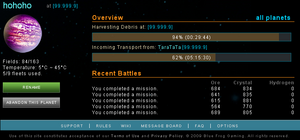
The Home page gives you an overview for your currently selected Planet. Here the main screen is split in two sections:
On the left side, you will see the following details and options of the planet:
- Name and Coordinates.
- The used and available Fields.
- The temperature range.
- A rename button.
- A button to abandon this planet.
On the right, you can see the planet's current activity.
- Missons progress.
- Buildings construction progress.
- Research progress.
- Incoming and outgoing Transports.
- Incoming and outgoing Deployments.
- Attacks to and from the planet.
- A history of the Resources gathered from recent battles.
Note that you can also select All Planets to get an overview of all your planets at once.
Crew 
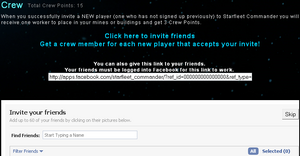
The Crew section allows you to invite new players to the game who have not played Starfleet Commander in the past. When a person accepts your request to join the game, you will receive a message telling you so and gain a new crew member. Don't forget to add them to your Buddies if you wish so, as this does not happen automatically. Your total Crew Points are displayed at the top of the main screen. Each crew member functions like a combination of all Droids available in the game, with a few advantages:
- They can be assigned to Mines, the Research Lab and other Buildings.
- They provide a 4% bonus instead of the regular 2% from other droids.
- They provide 3 Crew Points, unlike the Crew Droid which only provides 1.
You will also notice that the 3 Crew Points are provided at all times, even if the member is assigned to a specific task. If one of your Crew members decides to stop playing the game, you will keep him as a member even after his account has been deleted past the 35 days of inactivity limit.
Note that you can only send a limited number of requests, which also depends on the number of Gifts you have not used in a day. This is a limitation by Facebook, but it can easily be bypassed by just sending your friend the link provided on that screen.
Fleets 
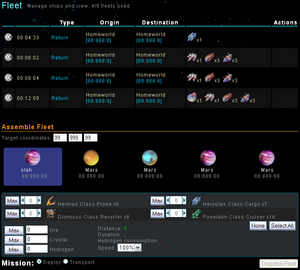
The Fleets section gives you a detailed overview of all fleets that are currently in use. It also lets you manage the ships that are waiting in orbit of the currently selected Planet, the total amount of possible fleet slots and how many being are used, hired Admiral bonus of +1 fleet slot included. The section can be divided in two:
Active Fleets Status You will have two lines for each fleet, one for the first leg of the trip, one for the second leg, even when it is only a one way trip. The details are as follows:
- << indicates the return trip.
- Time left for the trip. Note that the return trip also includes the first leg.
- Type indicates what type of mission the fleet is doing.
- Origin displays the name and coordinates of point of origin.
- Destination displays the name and coordinates of the destination point.
- This column shows what ships are part of the fleet.
- Actions gives you different options for the fleet, this depends on the type of trip.
Assemble Fleet
Allows you send a custom fleet to a specific destination and mission. You can either enter the Target coordinates manually, or select one of your Planets as the destination.
Below your planets, you can select which and how many ships you want to be part of your custom fleet, at which speed they should travel and if you want them to transport resources.
When assembling your fleet, the distance, duration and consumption of the flight will be automatically modified when you change the destination.
Now you just have select the kind of mission the fleet has to perform and hit the Dispatch Fleet button to the right.
Tech 
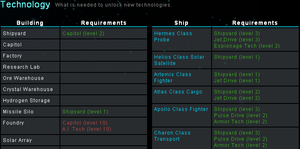
The Technology screen is basically a tech-tree, showing everything you can build and do within the game and the requirements to do so. When the requirements are met, they will be displayed in green, unmet requirements are displayed in red.
